-
Release Notes
- July 8, 2024
- May 22, 2024
- April 17, 2024
- March 20, 2024
- February 22, 2024
- January 18, 2024
- 2023 Releases
- 2022 Releases
-
2021 Releases
- December 20, 2021
- December 1, 2021
- November 22, 2021
- November 4, 2021
- October 26, 2021
- September 30, 2021
- September 22, 2021
- September 2, 2021
- August 16, 2021
- August 2, 2021
- July 19, 2021
- July 1, 2021
- June 17, 2021
- June 1, 2021
- April 30, 2021
- April 8, 2021
- March 25, 2021
- March 15, 2021
- February 25, 2021
- February 8, 2021
- January 28, 2021
- January 21, 2021
- January 13, 2021
- 2020 Releases
- Getting Started
- Ports
- Cross Connects
- Point-to-Point
- Virtual Circuits
-
Cloud Connections
- Cloud Connectivity Overview
- Hosted vs. Dedicated Connections
- Cloud On-Ramps
- General
- Amazon Web Services
- Google Cloud Platform
- Microsoft Azure
- IBM Cloud
- Oracle Cloud Infrastructure
- Troubleshooting
- FAQ
- Cloud Router
- Marketplace & IX
- Storage
- Administration
- Billing
- Troubleshooting & FAQ
- Technical Reference
- Partners Portal
- API & Automation
Provision a Port via the API
Before you begin
Ensure you have a bearer token authorizing all your API calls. For information on authorizing calls, see one of the following pages:
- Using Postman with the PacketFabric API
- Using cURL with the PacketFabric API
- Using Python Requests with the PacketFabric API
API reference
Parameters and attributes
To provision a port, you will need the following information:
- Header row
- Parameter
- Required
- Description
- Row 1
account_uuid
string- Yes
- Billing account ID (see below).
- Row 1
-
pop
string -
Yes
-
Point of presence in which the port should be located.
Use
/v2.1/locationswith filters as needed or see our locations page .
-
- Row 1
-
speed
string -
Yes
-
Speed of the port: “1Gbps” “10Gbps” “40Gbps” “100Gbps”.
Use
/v2/locations/{pop}/port-availabilityto verify that the appropriate speed is available in the POP.
-
- Row 1
-
media
string -
Yes
-
Optic media type: “LX” “EX” “ZX” “LR” “ER” “ER DWDM” “ZR” “ZR DWDM” “LR4” “ER4” “CWDM4” “LR4” “ER4 Lite”.
Use
/v2/locations/{pop}/port-availabilityto verify what optic types are available for your chosen speed and location.
-
- Row 1
subscription_term
integer- Yes
- Duration of the contract in months: 1, 12, 24, or 36.
- Row 1
-
zone
string -
No
-
Availabilty zone of the port.
Use
/v2/locations/{pop}/port-availabilityto verify the availability zones in the POP.
-
- Row 1
autoneg
boolean- No
- Only applicable to 1Gbps ports. Controls whether auto negotiation is on (
true) or off (false).
- Row 1
description
string- No
- Brief description of the port.
- Row 1
-
nni
boolean -
No
-
Set this to
trueto provision an ENNI port.NOTE: By default, ENNI ports are not available to all users. If you want to create an ENNI port, contact [email protected].
-
Find the billing account ID
For information on finding your billing account ID, see Get the Account UUID .
Gather location information
When you provision a port, you will be required to provide the point of presence (POP) in which you want your port. You may also want to specify the availability zone in which to provision the port.
The following GET call will return all PacketFabric locations: https://api.packetfabric.com/v2.1/locations
However, this list is extensive, so you should add one or more location filters: pop, city, state, market, region. For example, to see all POPs in the the New York City metro area, you could use https://api.packetfabric.com/v2.1/locations?market=nyc.
TIP: You can also browse locations from the portal or from our website.
If you would prefer to only use the API, you can use /v2/locations/markets and /v2/locations/regions to get lists of our markets and regions.
View port availability for a POP
Once you have decided on a POP, check port availability using the following GET call:
https://api.packetfabric.com/v2/locations/{pop}/port-availability
This will return the remaining information that you will need when provisioning your port, for example:
    {
        "speed": "100Gbps",
        "media": "LR4",
        "zone": "Y",
        "partial": false,
        "enni": true,
        "count": 14
    },
    {
        "speed": "100Gbps",
        "media": "CWDM4",
        "zone": "Y",
        "partial": false,
        "enni": true,
        "count": 2
    },
Note speed and media, as those will be required when you provision the port.
You can also note the available zones and whether the port is an ENNI port (note that most customers will not need ENNI ports, and ENNI ports come with an additional cost).
NOTE: The {pop} parameter is case sensitive.
For example, https://api.packetfabric.com/v2/locations/DAL1/port-availability returns information about the DAL1 pop, but https://api.packetfabric.com/v2/locations/dal1/port-availability returns an error stating the location can’t be found.
Provision the port
Postman
-
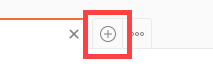
Open Postman and click the plus icon to add a new request.
-
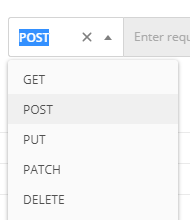
Select POST from the drop-down menu that appears before the URL field.
-
Enter the following API call into the URL field:
https://api.packetfabric.com/v2/ports -
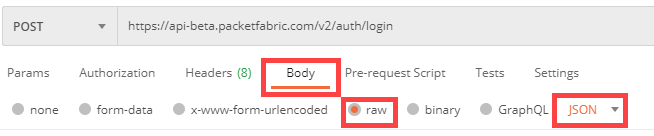
Select the Body subtab and then select raw. Select JSON from the drop-down menu (see below for an example that you can copy and paste):
-
In the space below, set your parameters. For example (include the curly brackets):

-
Click Send.
If successful, the response will display details about the provisioning port. Ensure you note the port_circuit_id, you can use this with https://api.packetfabric.com/v2/ports/{port_circuit_id} to check on the status of your port.
JSON sample
Here is a JSON sample for you to copy and then modify accordingly:
{
"account_uuid": "your-account-uuid",
"pop": "POPX",
"speed": "1Gbps",
"media": "ZX",
"subscription_term": 1,
"zone": "Y",
"autoneg": true,
"description": "My API port",
"nni": false
}
cURL
curl -X POST https://api.packetfabric.com/v2/ports -d @api.json -H "accept: */*" -H "Authorization: Bearer replace_with_api_key"The contents of api.json will be similar to the following (modified to include your information):
{
"account_uuid": "your-account-uuid",
"pop": "POPX",
"speed": "1Gbps",
"media": "ZX",
"subscription_term": 1,
"zone": "Y",
"autoneg": true,
"description": "My API port",
"nni": false
}
Requests
import requests
api_key = 'replace_with_api_key'
request_header = {
'Authorization': f'Bearer {api_key}'
}
post_url = 'placeholder_api.packetfabric.com/v2/ports'
post_json = {
"account_uuid": "your-account-uuid",
"pop": "POPX",
"speed": "1Gbps",
"media": "ZX",
"subscription_term": 1,
"zone": "Y",
"autoneg": True,
"description": "My API port",
"nni": False
}
api = requests.post(post_url, json=post_json, headers=request_header)
print(api)
Updated on 14 Jul 2022